Easy answer: you can’t…
That’s not entirely true. You could dry the timbers in a vacuum kiln and definitely not use them outside and keep them away from direct sunlight. Probably a good idea to speak in low, soothing tones around those timbers too.
I joke, but the reality is that these cracks or checks are just the nature of wood. Checking can be controlled in “regular” sized 4/4 through 8/4 or even 10/4 lumber, because this thinner stuff is easier to dry. But when you get into thicker pieces like 12/4 and up into 6×6 and 12×12 timbers, you are looking at a sizable cross section of the original log. This means it will behave more like a log in the yard than a board.
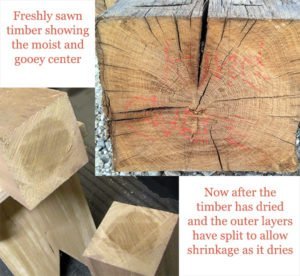 With so much insulation around the center of the timber, it will retain moisture much longer than the outer layers. As the outer layers dry and shrink, they are halted by the moist inner layer, and they have no recourse but to crack. There is just no way to avoid these checks, and if you aren’t seeing them, then there is probably a much bigger issue to be concerned with – like a rotten core.
Moreover, different woods will check differently. The denser, heavy woods like Ipe can check more readily than something like Douglas Fir. With higher density there is less empty space for the wood fibers to compress into. Checks will open readily, but usually in Ipe’s case, the wood is stable enough that the checks will be pretty small. There may be more of them, but they will be small and usually only skin deep. On a less dense species like Fir, it is common to see deep checks that are quite wide and open like an explosive crack, because the timber has been shrinking and compressing into the empty space and building up pressure until the fibers give way.
The key thing to remember is that these checks do not affect the structural integrity of a timber. In fact, it usually makes it stronger, because it releases the tension built up internally.

The problem with this kerfing approach is that it requires the kerf to be cut before the timber begins to dry. Most of us don’t get our hands on the material this early in the process, and many times when you work with a large timber, it has already been kiln dried or air dried on a yard somewhere for a long time. Even here at McIlvain, we seal the ends of our timbers and store them in the shade, which goes a long way towards preventing the checking.
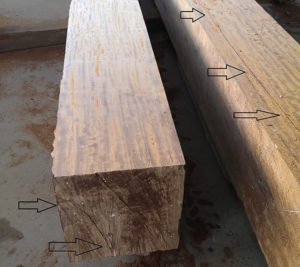
One final thing to consider is that these timbers will never stop moving. Especially the ones used outside. In fact, the checks will open and close as the outer layers of the timber pick up and shed moisture. It is for this reason that the checks should NOT be filled in with epoxy or something similar. Look at it this way: checking only adds character and uniqueness to your deck or home, and why not embrace it.
Learn more about the lumber industry:



Thanks for the info. I was worried about the cracks I found in the pillars on my second story deck. It is good news to know that it really only makes it stronger. I just worry that it could allow rain and water into the wood easier. I will have to get up there and try and retain the wood I think. Maybe I will have someone look at it for me.
Could you prevent a wooden post/pillar from checking if you bored a hole through the center of it to reduce the size of the cross section? If so, it would, at least, allow you to retain the aesthetics of a single chunk of wood.
I wouldn’t recommend this. First it would be impractical to execute this without some highly specialized machines. Boring a hole through end grain the length of a post would be brutal on the tooling and the wood itself. This would reduce the cross section and it would open up some dead space to allow some expansion and contraction. However, the outer layers will still expand and contract across the grain and still would be prone to checking in extreme conditions where bright sunlight bakes the wood and cooler evening temperatures cools it dramatically. But now not only to you have a check in the post, but it could even break through to your bored out center and weaken the entire structure.
hi this might be wierd question i want to make the cracks happen ….
i want to achieve cracks shakes etc in a project im working on
7×7 beams i want them to crack heavily there also pitch pine
if anyone can help achieve this please let me know
thanks mike
Stick them in direct sunlight for a few hours and those checks will open, especially on a hot day. But they may close up a bit when it cools down and they are brought into the shade.
If you use 2X10 or 2X12 Doug fir for floor joist does checking make it weaker
You shouldn’t see nearly as much checking in a 2 by product unless it wasn’t dried very well before use. That said construction lumber is an entirely different ball of wax and is graded for structural use and checking shouldn’t effect much. But you have to follow your gut here if the checks become large splits.
I have a question about some very large beams that I am working with. One of them has already rotted through terribly and I am having to replace it. The other one, which is closer to the primary structure and therefore, not as exposed to the elements, has these long, wide, cracks in it and the business owner is asking that I do something to prevent that beam from going bad like the first one. These beams are 12″ x 18″ x 24′ long and weigh about 2000 #’s each. It is going to be a challenge to replace the one that is rotted. Anyway, after reading this site, it seems that you are saying that I should NOT attempt to repair the cracks in the other beam using a resin or other material, but rather explain to the customer that the cracks are normal and should be left alone. Is that true? Can I send photos for a professional opinion?
I am in Spring, TX, just north of Houston, and it is super hot and humid here, so not sure how that affects the beams.
Some of this will depend on the species you are using. If it isn’t a natural choice for an exterior wood then those cracks could be a great place for rot to take hold. But honestly even a good exterior species won’t do well if you have cracks where water can get trapped. Structurally the cracks shouldn’t be an issue (again depending on the species) but filling them to prevent standing water would be a good idea if the water won’t run off naturally due to a horizontal placement or similar.
I have this 10″ X 10″ beam in my timberframe home that has some end grain checking. It is not exposed to the weather or to direct sunlight. I realize that it should not bother me but It does, a little. I’m wondering if I can place angle iron on the corners and clamp it to close the cracks until it cures more thoroughly.
The checking is due to climate control in the house and unless you had fully dried timbers (a near impossibility) this is to be expected. You can try clamping it but that will introduce more tension into the beam and additional cracks could open elsewhere. Moreover as soon as you unclamp the beam those cracks will come back. Its also likely that the cracks will close up on their own in the summer but will only open again in the fall and winter when the heat comes on.
Thanks Shannon.
I installed a pellet stove and now have alot of cracks in my ceiling 8×8 beams. I put humidifiers in and have not seen any shrinkage of the cracks. Can i drill and use lag bolts to pull the wood back together?
That may work but you will probably want some wider cauls or the bolts will just pull the cracks together near the bolt. You will need a lot of bolts to close up the cracks entirely. At the same time putting the beam under tension could result in cracks on other faces.
I built a log home and mounted a large cedar tree in the den with the bark removed. Around the tree is a stairwell up to the 2nd floor landing. The steps are cedar logs cut in half and mounted into the main cedar trunk. I have noticed cracks in the main trunk which are not very wide, but I have one crack that is 1/4 to 3/8 inches wide and goes down the length of the stairwell. I wanted to apply one of the adhesive caulks on the market in the large crack, but I’m not sure after reading your article. What would you suggest?
The cracks certainly won’t hurt anything structurally. A caulk would be your best best to fill them because the caulk is flexible and will move with the log as the cracks open and close due to seasonal expansion and contraction. So I guess it really comes down to appearance. I’m not sure if you are looking at a particular product for this so I can’t really comment on the aesthetics.
I’m replacing a bow stem on my wooden boat. The cracks really worry me,. I understand it’s natural but I don’t want to allow water to penetrate. I’m using a 4x14x 12’ piece of white Oak. Any suggestions????
Use a marine epoxy to fill the cracks. It will flex with the wood as those cracks open and close from season to season.
This house is 45 years old. I have lived here for 10 years. This has been a very cold, dry winter and the wood stove is heating all the time. I now have serious checking in most of the posts and beams, some are twisting It worries me to see this as it only happened in the last month. Also, our soft pine floors are now checking badly too. I feel I should get an engineer in to assess the damage.
This is bound to happen with such extreme conditions with the cold winter and the very warm dry heat of the wood stove. Most like those cracks aren’t new but have just opened up to the point where they are noticeable. My bet is they will close up and be invisible again in a few months. I highly doubt you have any structural loss.
Thanks for this information, I am doing one project where I am supplying Red Meranti Wood from Malaysia in two different sizes… 127mm x 76mm and 101mm x 63mm which is for Door Frame. Now I would like to inform you that these wood were KD and moister content was below 15% to 18%. We assembled the frame and handed over to Client, now their Quality person observes cracks on the surface and rejected. Please advice me what I should explain him for this….
When making something precise like a door frame I would have preferred the wood to be down to the 6-8% range and 15-18 is still pretty high. At that thickness the interior of those boards would have been even higher in moisture content so the outer parts of the board are drying out faster than the interior and the expansion cracks are opening up. They will mostly likely go away over time but no one will guarantee this to happen.
What about a crack in horizontal cross beam of front porch? It supports the roof line overhang of porch. I live in dry hot western climate with rain thru winter. Is this a safety issue? House was built in the late 40s.
Hard to say with certainty as there are so many variables but I suspect the crack is exactly as described in the article: just differential drying that is relieving stress and should make for a more stable beam.
I have a wood beam that is nominally 12”x6” that supports joists on one side, with joist hangers that are attached to the upper side of the beam. The lower portion of the beam is not laterally braced. The beam also has post from the roof above, residing on it, that are aligned with the lower support beams. The beam is supported by a threaded screw between the posts and the beam (that essentially creates a hinge point verses solid bearing).
The beam has a large check but of more of a concern is that the lower portion of the beam below the check is twisting outward away from the joist side, as much as 1.5″ to 2″ at the bottom of the beam.
I have a few pictures that would help illustrate exactly what is occurring-but I don’t know how to upload them.
Appreciate your opinion about the beam-is the lateral movement a failure concern?
Bill, I would definitely consult with an engineer on this one. You have a lot more going on with multiple tie in points and force vectors. I’m just not qualified to answer this.
I have a beam its I guess supporting my home??? Anyways, it’s checking which looks like to have deep cracks. I’ve called my seller and he says it’s the type of wood. I’m worried about termites getting into the cracks and finding a way inside. I want to tell them to replace because of this but if they use timber again, it’ll only continue to check. What’s the odds of termites getting into the checks and destroying the beam and home
I’m not really qualified to speak about termites but I can tell you that as boring insects they don’t need checks in a beam to get into the wood. They chew their way in regardless.
Shannon, I listen to you on wood talk and love the wood reports you give. I build furniture so I understand wood movement. Recently built an addition to the house with a flat roof. I have four 8 inch rough cedar beams extending through the roof into my shop below. And I will be adding an arbor with the beams supporting it. The beams have been in place for about 10 months and some have checks the entire distance vertically. I’m not concerned about strength, but am concerned about water getting into those cracks and into my shop below. I plan on installing metal caps on the exposed tops but am concerned that when it rains water could get into the vertical cracks and run down into my shop. Do I just live with it or is there something I can do to prevent that?
So the beams are exposed to the elements above? Doesn’t building code require some kind of roofing material over top of the beams like paper or shingles or something to that effect. I think your concern is valid which is why additional roofing work should probably be done. Having the water run all the way through the beam would actually be preferred to have it pool and stand inside the crack where it can accelerate decay in the beam itself.
i have a deck on the back of our house built with pressure treated lumber and it has a roof. I was preparing it for stain and noticed that a few of the supporting posts have decent size cracks running north & south in the posts. Is there any concern over structural integrity with the roof posts?
No. As stated in the article in many ways those cracks release the tension in the wood and make it more stable.
we have 8″ x 8″ cedar posts on our front and back porches and are needing to stain or seal them now that they have cured. what do you recommend?
This depends on the look you want but when it comes to exteriors I prefer an oil. An oil finish will soak in and provide some protection to the elements but also help to slow the moisture exchange that can cause large cracks to open in the posts. It will require additional maintenance annually or bi-annually but so would any finish. A film finish like a varnish however will need to be stripped away before a fresh coat is applied whereas an oil need only be reapplied.
I have a porch with cedar beams horizontally and vertically. I saw a previous comment about using oil as opposed to stain. They are already stained but will need more care in a year or two. can I apply oil over the stain? would i need to power wash it first? What kind of oil do you recommend? Thanks.
It depends on what you mean by “stain”. Stain is a mixture of pigment in solution where the solution whether oil or water based evaporates away leaving behind the color (pigment). Some “stain” also incorporates a varnish that adds a film layer to protect the wood and the pigment. If this is a varnish then it is best to remove the varnish by sanding before applying a fresh coat of oil. Power washing might help but I recommend going straight to sanding as that will be quicker in the long run. If there is varnish in the mix you will be able to see the finish flaking away over time indicating that film finish is starting to fail as water gets underneath it.
Im not sure why this is IN all caps but heres my Question. Im thinking about installing some 7×7 custom cut posts (either cypress or white ceDar) On our covered porCh. Is there a way to reduce the checking? Im in south alabama. Would applying an oil baSed stain help with that? Thanks
So much of this depends on the moisture content (or uniformity of MC) in those timbers. Certainly an oil will help slow down moisture loss and absorption which will reduce stress on the timbers and prevent checking. But if your timbers have a significantly different moisture content than the surrounding environment and there is a differential from the center of the timber to the outer inch or so, I don’t think there is much you can do to prevent check at all. Your best bet is to have the timbers thoroughly and uniformly dried in something like an RF kiln first. In the south with all that high humidity it will stick check if there is a differential from the core to the outer layers of wood.